Android-Recovery-Transfer
Android Recovery, Android Transfer
Have you ever needed to get your photos, messages, or contacts back from iCloud, but didn't want to wipe your iPhone or iPad and start from scratch? You're not alone. Many users think that to restore their data from an iCloud backup, they have to reset their device to its factory settings, which is pretty inconvenient, to say the least.
The good news? That's not actually the case. This article is going to show you how to pull your information from iCloud without doing a full reset. We'll cover the nitty-gritty of retrieving your stuff, like those vacation photos you thought you'd lost or the contact list you need for work, right from the cloud, all without losing your current apps, settings, or data.
No more worrying about the hassle of starting over or the potential loss that comes with a factory reset. We're here to help you navigate through a hassle-free restoration process. Stay tuned, as we'll dive deep into how to safely and effectively get your data back in your hands exactly where you want it: on your device, as it is right now.
Ready to get started? Let’s jump in and say goodbye to unnecessary device resets.What is iCloud Backup?
Think of iCloud backup like a safety net for your iPhone. It's a way to save a copy of all the stuff on your phone, your photos, text messages, apps, and settings to Apple's online storage space, which is called iCloud. You're probably already using iCloud to store photos or backup your phone even if you don't realize it. It happens automatically when your iPhone is plugged in, locked, and connected to Wi-Fi.What Can iCloud Backup Do?
So why is this backup thing important? Let's say you lose your phone, it gets damaged, or you want to move your stuff to a new iPhone. iCloud Backup is like a magic wand that lets you bring back your personal data. From your contacts to your selfies, everything can be restored. It's especially handy when you get a new iPhone and want your old stuff there waiting for you.Why Choose iCloud Backup?
Now, why use iCloud over other options? The biggest plus is convenience. It's built right into your iPhone and works quietly in the background. You don't have to do much to keep your data safe—it just takes care of itself. Apple also has security measures in place, so your information is kept private and secure.That’s the rundown on iCloud Backup. With it, you won't have to worry about losing your important stuff and can rest easy knowing it's all stored safely in the cloud.
Understanding Non-Reset iCloud Backup RestorationA. Overview of Traditional iCloud Backup Restoration Process:
Traditionally, when restoring from iCloud backup, users need to reset their device to factory settings.This process erases all existing data on the device before restoring the selected backup.
While effective, it may not be ideal for users who wish to retain their current data.B. Introduction to Non-Reset Method:
The non-reset method of iCloud backup restoration allows users to restore data from iCloud backup without resetting the device.Unlike the traditional method, it enables users to keep their current data intact while selectively restoring specific content from the backup.
C. Advantages of Non-Reset Method:
Preserves Existing Data: Users can maintain their current settings, apps, and personal data without erasing anything.Selective Restoration: Users have the flexibility to choose which specific content they want to restore from the iCloud backup.
Time-Saving: Since there's no need to reset the device, the non-reset method can save time, especially for users with large amounts of data.Prerequisites to Avoid Reset
Before diving into the technicalities of restoring your iPhone, let's cut to the chase. You want to get your phone back to how it was without the hassle of starting from zero, right? Here's what you need to do to make that happen without a factory reset:1. Have a Recent iCloud Backup: Before anything else, make sure you've backed up your iPhone to iCloud. Just double-check in your phone settings that this is done.
2. Be on Wi-Fi: You need a Wi-Fi connection to both back up and restore your phone data from iCloud.3. Check iCloud Space: Look at your iCloud storage. If it's full, you might need to clear some space or get more storage.
4. Check iPhone Space: Make sure your iPhone isn't full. You'll need room on your device to bring back your data.5. Apple ID Ready: Know your Apple ID and password because you're going to need them to get into iCloud.
6. Skip the Reset: When you want to get stuff back onto your iPhone, there's no need to completely wipe your phone. Just erase what you need through the settings, and then choose to restore from your iCloud backup when you're setting it up again.As long as you've got these things sorted, you can bring back your photos, contacts, and whatever else you need from iCloud, without having to reset your iPhone to factory settings.
2. Wi-Fi Connection: Before you get started, you've got to be connected to Wi-Fi. No Wi-Fi means no restoring, so hook up to a stable network.
3. Update iOS: Your iPhone needs to be on the latest version of iOS that’s compatible with the backup. Go to Settings, then General, and tap on Software Update to see if there's an update waiting.4. Erase if Needed: If you've already set up your iPhone as new, you’ll need to erase it before using the iCloud backup. You can do this by going to Settings, then General, Reset, and choosing 'Erase All Content and Settings.' However, if you’ve just turned on your iPhone for the first time, or after a reset, you can proceed to the next step.
5. Start The Restore: No reset? Great. When you're at the 'Apps & Data' screen, choose ‘Restore from iCloud Backup,’ sign in with your Apple ID, and pick the backup you want to restore from.6. Wait It Out: Patience is key. The restore time can range from a few minutes to a couple of hours, depending on your backup size and Wi-Fi speed.
7. Finish Up: Some apps may continue to download after the initial restore. Keep your device connected to Wi-Fi and plugged into power to let everything finish up smoothly.Follow these steps, and you’ll have your iPhone up and running with all your previous data and settings, no factory reset needed.
While restoring an iPhone from iCloud backup directly has its advantages, it's only fair to highlight some drawbacks of this approach.1. Reliance on Wi-Fi: The process requires a strong and stable Wi-Fi connection to download data from iCloud. If your internet connection is shaky or slow, the restoration process can be painfully time-consuming or incomplete.
2. Storage Limit: Free iCloud storage is limited to 5GB. If your backups exceed this limit, you'll need to purchase more space or constantly manage your backups to stay within the limit.3. OS Compatibility: The iPhone must be running on an iOS version compatible with the one used when the backup was created. This could pose issues if you downgraded your operating system after creating a backup.
4. Incomplete Recovery: Sometimes, not all data gets restored. For instance, secure information such as passwords or health data might not be included in the backup.5. Risk of Data Loss: If any issues occur during the restore process or if the backup file is corrupt, it might result in data loss.
Bear in mind these potential pitfalls when considering whether to use an iCloud backup for restoration without a reset.So the below solution will introduce 2 ways to let you preview and restore important data from iCloud backup selectively without reset.
iPhone Data Recovery is a comprehensive software suite that allows users to recover lost or deleted data from their iOS devices, as well as extract data from iTunes and iCloud backups. It's a practical option for when direct recovery from the device is not possible.
Feature Description
The software boasts several features, focusing mainly on data recovery:1. 3 Recovery mode: Restore data from iPhone storage, extract iTunes or iCloud backup.
2. Data Extraction from Backups: Users can extract data from their iCloud backups without having to perform a complete restore on their devices.3. Selective Recovery: Allows you to preview and selectively recover specific files or types of data.
4. Broad Data Recovery Options: Recover various types of data including contacts, messages, call logs, photos, notes, and app data.5. iOS System Recovery: Fix various iOS system issues like recovery mode, white Apple logo, black screen, looping on start without data loss.
6. Compatibility: Suitable for a wide range of iOS devices and iOS versions, including iPhone 15 Pro Max/Plus/14/13/12/11 and more.


2. Launch the Program: Open the software and tap "iPhone Data Recovery" feature, choose the 'Recover from iCloud Backup File' option from the main menu.
3. Sign In to iCloud: You’ll need to sign in using your Apple ID and password to access your iCloud backups. Ensure you don't have two-factor authentication enabled or have a way to receive the verification code if you do.
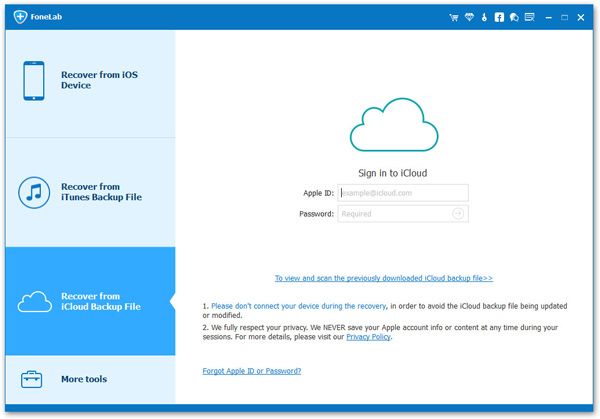
4. Select the Backup: Once logged in, the program will show all the iCloud backup files in your account. Select the one you want to extract data from and click the 'Download' button.

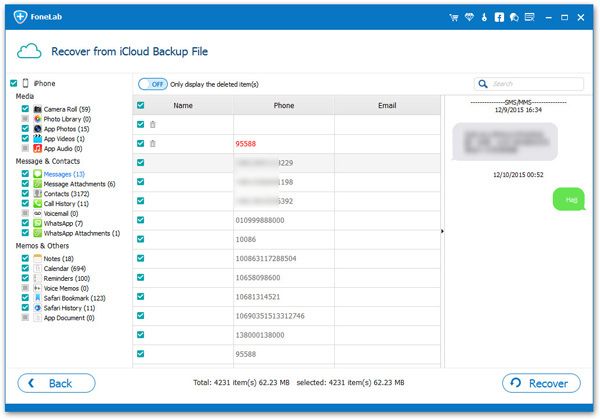
6. Preview and Recover: After the download completes, preview the contents and select the items you wish to restore. Click on the 'Recover' button to save them to your computer.
1. Access iCloud Website: Open your web browser and navigate to iCloud.com. Then sign in with your Apple ID and password.
2. Navigate to Data Sections: Once signed in, you'll see a variety of icons representing different types of data synced with iCloud, such as Photos, Contacts, Calendar, Notes, etc.3. Recover Files: If you want to recover deleted files, click on “Account Settings” and scroll down to the bottom of the page to the "Advanced" section. There you'll find options such as "Restore Files," which can be used to recover recently deleted documents or data.
4. Contacts, Calendars, and More: Should you need to restore contacts, calendars, reminders, or bookmarks, use the respective options in the "Advanced" section on the iCloud settings page.5. Restoring Files: To restore a file, tick the checkbox beside the file you wish to restore and click "Restore." Be careful with contacts, calendars, and bookmarks as restoring these will replace the current data on all your devices synced with iCloud.
6. Photos Recovery: For restoring photos, go to the "Photos" section where you can see deleted photos in the "Recently Deleted" album which holds deleted photos for up to 30 days.Notes: If recovering notes, simply click on the "Notes" icon, find the "Recently Deleted" folder and move the notes back to your "Notes" folder.
Remember, you can only recover data that has been backed up to iCloud and is within the retention period. For files and photos, this is typically 30 days after deletion. For recovering contacts, calendars, and bookmarks, iCloud allows you to archive your data, which you can restore from, replacing the existing data on all your devices. The recovery feature is somewhat limited compared to dedicated data recovery tools. It may not recover all types of data, especially app-specific information, such as WhatsApp attachments, SMS, MMS, iMessages, voice memos, and photo stream.. Be sure to check which version is most appropriate for your needs before performing the restore.
1. Regular Backups: Make sure you back up your phone or computer all the time. If you’re using an iPhone or iPad, turn on iCloud backups to run automatically when you’re charging and connected to Wi-Fi. Or, plug it into your computer and back up with iTunes or Finder.
2. Use Multiple Backup Solutions: Use more than one way to save your data. Besides iCloud, keep backups on an external hard drive or another online storage service. This is like having a spare key; if one backup fails, you’ve got another.3. Archive Important Data: If you’ve got really important files, make extra copies and save them in different places. Use online storage, external hard drives, or even print them out or burn to DVDs if they’re super critical.
4. Manage Storage Space: Check that there’s enough room in iCloud so your backups don’t fail. Clean out junk you don’t need to make sure there’s room for the important stuff to back up.5. Enable Automatic Syncing: Make sure stuff like your contacts and calendar update everywhere by turning on sync in iCloud. This way, what you have on one device shows up on the others instantly.
By consistently backing up and taking a conscious approach to how you manage your digital data, you can significantly reduce the risks of data loss.
1. Connect to Wi-Fi: First, make sure your device is connected to a Wi-Fi network.
2. Open Settings: On your iPhone or iPad, tap on the 'Settings' app.3. Access Your Profile: At the top of Settings, you'll see your name. Tap on it.
4. Tap on iCloud: After tapping your name, you'll find a list of options. Press 'iCloud.'5. Manage Storage: Before backing up, you might want to check your iCloud storage to see if you have enough space. Tap on 'Manage Storage' if you need to clear some space or buy more.
6. iCloud Backup: Scroll down until you see 'iCloud Backup' and tap on it.7. Enable iCloud Backup: If it's not already turned on, switch the iCloud Backup toggle to the on position. It should turn green.
8. Start a Backup: Now, hit 'Back Up Now' to start backing up immediately to iCloud.Remember, your device must stay connected to Wi-Fi during the whole backup process, and it's best done overnight or when you're not using your device since it can take a while. Also, keep it connected to a charger if you're worried about the battery running out midway.
The time it takes to restore from an iCloud backup can vary quite a lot. It depends on a few factors:
The size of the backup: Larger backups have more data to download and take longer.The speed of your Wi-Fi connection: A faster internet connection can download data quicker.
The amount of content to be re-downloaded: Apps, music, and photos not stored in the backup must be re-downloaded from the App Store or iTunes.Typically, a restore could take from a few minutes to a few hours. However, if you have a lot of data and a slow internet connection, it could even take a day or more. It's usually fastest to start the restore process at a time when you don't need to use your device, like before you go to bed.
1. Partial Restoration: If you stop the restore, some of your data might come back, and some might not, depending on how far along the process was.
2. Incomplete App Installation: If apps were downloading, cutting off the restore could leave them hanging. You'd probably have to go back and restart the app downloads yourself.3. Data Sync Issues: Stopping the restore could lead to trouble when trying to get your contacts, calendar, and photos from iCloud. They might not sync up right since they didn't all download.
4. Potential Data Loss: iCloud normally tries to pick back up where it left off if a restore stops. But if things don't start up again as they should, you might lose whatever hadn't been restored up to that point.I. Check Your Wi-Fi Connection: Ensure that your Wi-Fi is stable and fast. Weak or intermittent connections can prolong the process.
II. Restart the Restore Process: Cancel the current restore. Restart your iPhone by turning it off and on. Attempt to restore from iCloud backup again.III. Reset Network Settings:
1. Go to Settings > General > Reset. Tap on "Reset Network Settings."2. Reconnect to your Wi-Fi and try restoring again.
3. Sign Out and Back into iCloud: Go to Settings > [your name] > Sign Out. Restart your device.4. Sign back into iCloud and initiate the restore process anew.
IV. Free Up Space:
If your device is low on space, the restoration might get stuck. Delete unnecessary apps or files to free up space and continue the restore.Alright, wrapping up today's chat on data recovery, we've realized just how huge it is to get our files back. It's not just about salvaging a few lost documents; it's about making sure those precious memories and big work projects don't vanish after an unexpected mishap. So, I'm urging you all to get into the habit of regularly backing up your data. Whether it's an automatic or a manual process, it's a safety net for when things go south.
And when you're messing with important files, take it easy and slow. Being careful reduces the chance of messing up and makes recovery—if needed—a whole lot smoother. Less time stressing, more time living. With how digital our lives are getting, keeping data safe is as critical as protecting our homes. Like the old saying goes: "better safe than sorry."Alright, friends, before you head out, just a reminder to keep your backups fresh and handle your data recoveries with care and attention. That way, we can ensure our information stays secure no matter what.


Copyright © android-recovery-transfer.com 2023. All rights reserved.


