Android-Recovery-Transfer
Android Recovery, Android Transfer
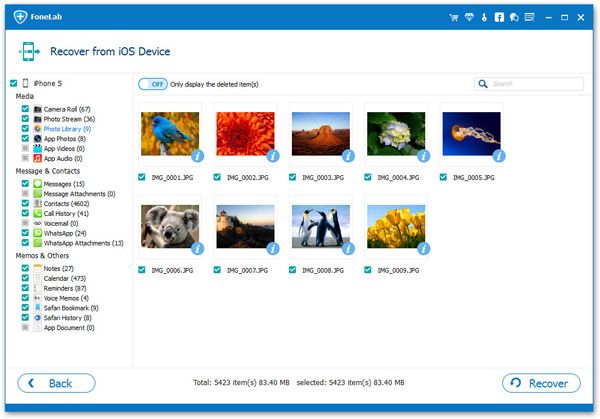
iOS Data Recovery can help you to scan and retrieve your lost data from your iPhone 5S, iPhone 4 iPhone 4S, iPhone 4, iPhone 3GS, iPod touch 5/4 and all iPads, including photos, contacts, videos, text messages, notes, etc. After recovered lost data successfully, the problem most of people encountered is that how to exit DFU mode (device's scanning mode) safely.
DFU stands for Device Firmware Update. It is a state that you can get your iPhone into where it can interface with iTunes but doesn't load the iPhone operating system or boot loader. Under DFU mode, you are enable to choose and change the firmware you want to install onto your iPhone. For example, if you want to install a previous version of iOS, unlock your SIM or jailbreak your iPhone, you should enter DFU Mode to complete these tasks. If (for whatever reason) standard recovery isn't working for you to get your device back to working condition, DFU may help you out.
Actually, there are two ways for you to exit the scanning mode of the iOS device.
Solution 1: Just close iOS Data Recovery program after you retrieved wanted data, then your device DFU mode will automatically exit and restart from normal mode.
Solution 2: Click the button "Restart device to normal" at the left-lower corner of the window of iOS Data Recovery program. Then your device will restart to normal.
Note: When you think your device is frozen, you need to wait a moment and don’t worry. Sometimes, it needs a few seconds to restart. If it still doesn't reflect anything, you can press the "Power" and the “Home” button at the same time for a while, until the white apple logo appear on the screen. Then your device will restart to normal in a few seconds.


Copyright © android-recovery-transfer.com 2023. All rights reserved.


